一、使用步骤
虽然Runnable接口实现多线程比继承Thread类实现多线程方法要好,但是Runnable接口里的run方法并不能返回操作结果。为了解决这样的矛盾,java提供了Callable接口。
创建并启动有返回值的线程的步骤如下:
- 创建Callable接口的实现类,并实现call()方法,该call()方法将作为线程执行体,且该call()方法有返回值,再创建Callable实现类的实例
- 使用FutureTask类来包装Callable对象,该FutureTask对象封装了该Callable对象的call()方法的返回值
- 使用FutureTask对象作为Thread对象的target创建并启动新线程
- 调用FutureTask对象的get()方法来获得子线程执行结束后的返回值
二、源码
这个接口的源码如下:
@FunctionalInterface
public interface Callable<V> {
    /**
     * Computes a result, or throws an exception if unable to do so.
     *
     * @return computed result
     * @throws Exception if unable to compute a result
     */
    V call() throws Exception;
}
call方法执行完线程的主体功能之后(类似于Runnable的run方法)会返回值,而返回值类型由Callable接口上的泛型决定。
以下是一个定义使用Callable接口的例子,定义了一个线程主体类:
class MyThread implements Callable<String>{
    private int ticket=10;
    @Override
    public String call() throws Exception{
        for(int i=0;i<200;i++){
            if(this.ticket>0){
                System.out.println("ticket="+ticket--);
            }
        }
        return "ticket sold out!";
    }
}
通过查看源码可以发现Thread类里面没有提供支持Callable接口的多线程应用。
通过继续查看源码可以发现,FutureTask< V >类,这个类主要是负责Callable接口对象操作,这个类的结构定义如下:
public class FutureTask<V> implements RunnableFuture<V>
RunnableFuture接口继承了Runnable接口和Future接口:
public interface RunnableFuture<V> extends Runnable, Future<V> {
    /**
     * Sets this Future to the result of its computation
     * unless it has been cancelled.
     */
    void run();
}
FutureTask类中有如下的构造方法:
/**
     * Creates a {@code FutureTask} that will, upon running, execute the
     * given {@code Callable}.
     *
     * @param  callable the callable task
     * @throws NullPointerException if the callable is null
     */
    public FutureTask(Callable<V> callable) {
        if (callable == null)
            throw new NullPointerException();
        this.callable = callable;
        this.state = NEW;       // ensure visibility of callable
    }
这个构造方法接收Callable接口对象或者继承了Callable接口对象的类,以此使得这个类能接收call方法的返回结果,从而放入值,而FutureTask又间接实现了Runnable接口和Future接口,Future接口的get方法负责取出值。
完整的Callable接口实现多线程的例子如下:
import java.util.concurrent.Callable;
import java.util.concurrent.ExecutionException;
import java.util.concurrent.FutureTask;

public class test {
    public static void main(String[] args) throws ExecutionException, InterruptedException {
        MyThread mt1=new MyThread();
        MyThread mt2=new MyThread();
        FutureTask<String> task1=new FutureTask<String>(mt1);
        FutureTask<String> task2=new FutureTask<String>(mt2);

        //FutureTask是Runnable接口的实现类/子类,所以Thread构造方法可以接收其对象
        new Thread(task1).start();
        new Thread(task2).start();

        //FutureTask同时是Future接口的实现类/子类,父接口的get方法可以获取其值
        System.out.println("A"+task1.get());
        System.out.println("B"+task2.get());
    }
}

class MyThread implements Callable<String>{
    private int ticket=10;
    @Override
    public String call() throws Exception{
        for(int i=0;i<200;i++){
            if(this.ticket>0){
                System.out.println("ticket="+ticket--);
            }
        }
        return "ticket sold out!";
    }
}
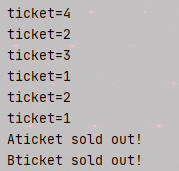
输出结果如下:

这种实现方式的麻烦之处在于既要接收返回值信息,并且又要与原始的多线程的实现靠拢。
 IDEA激活码


