加载顺序

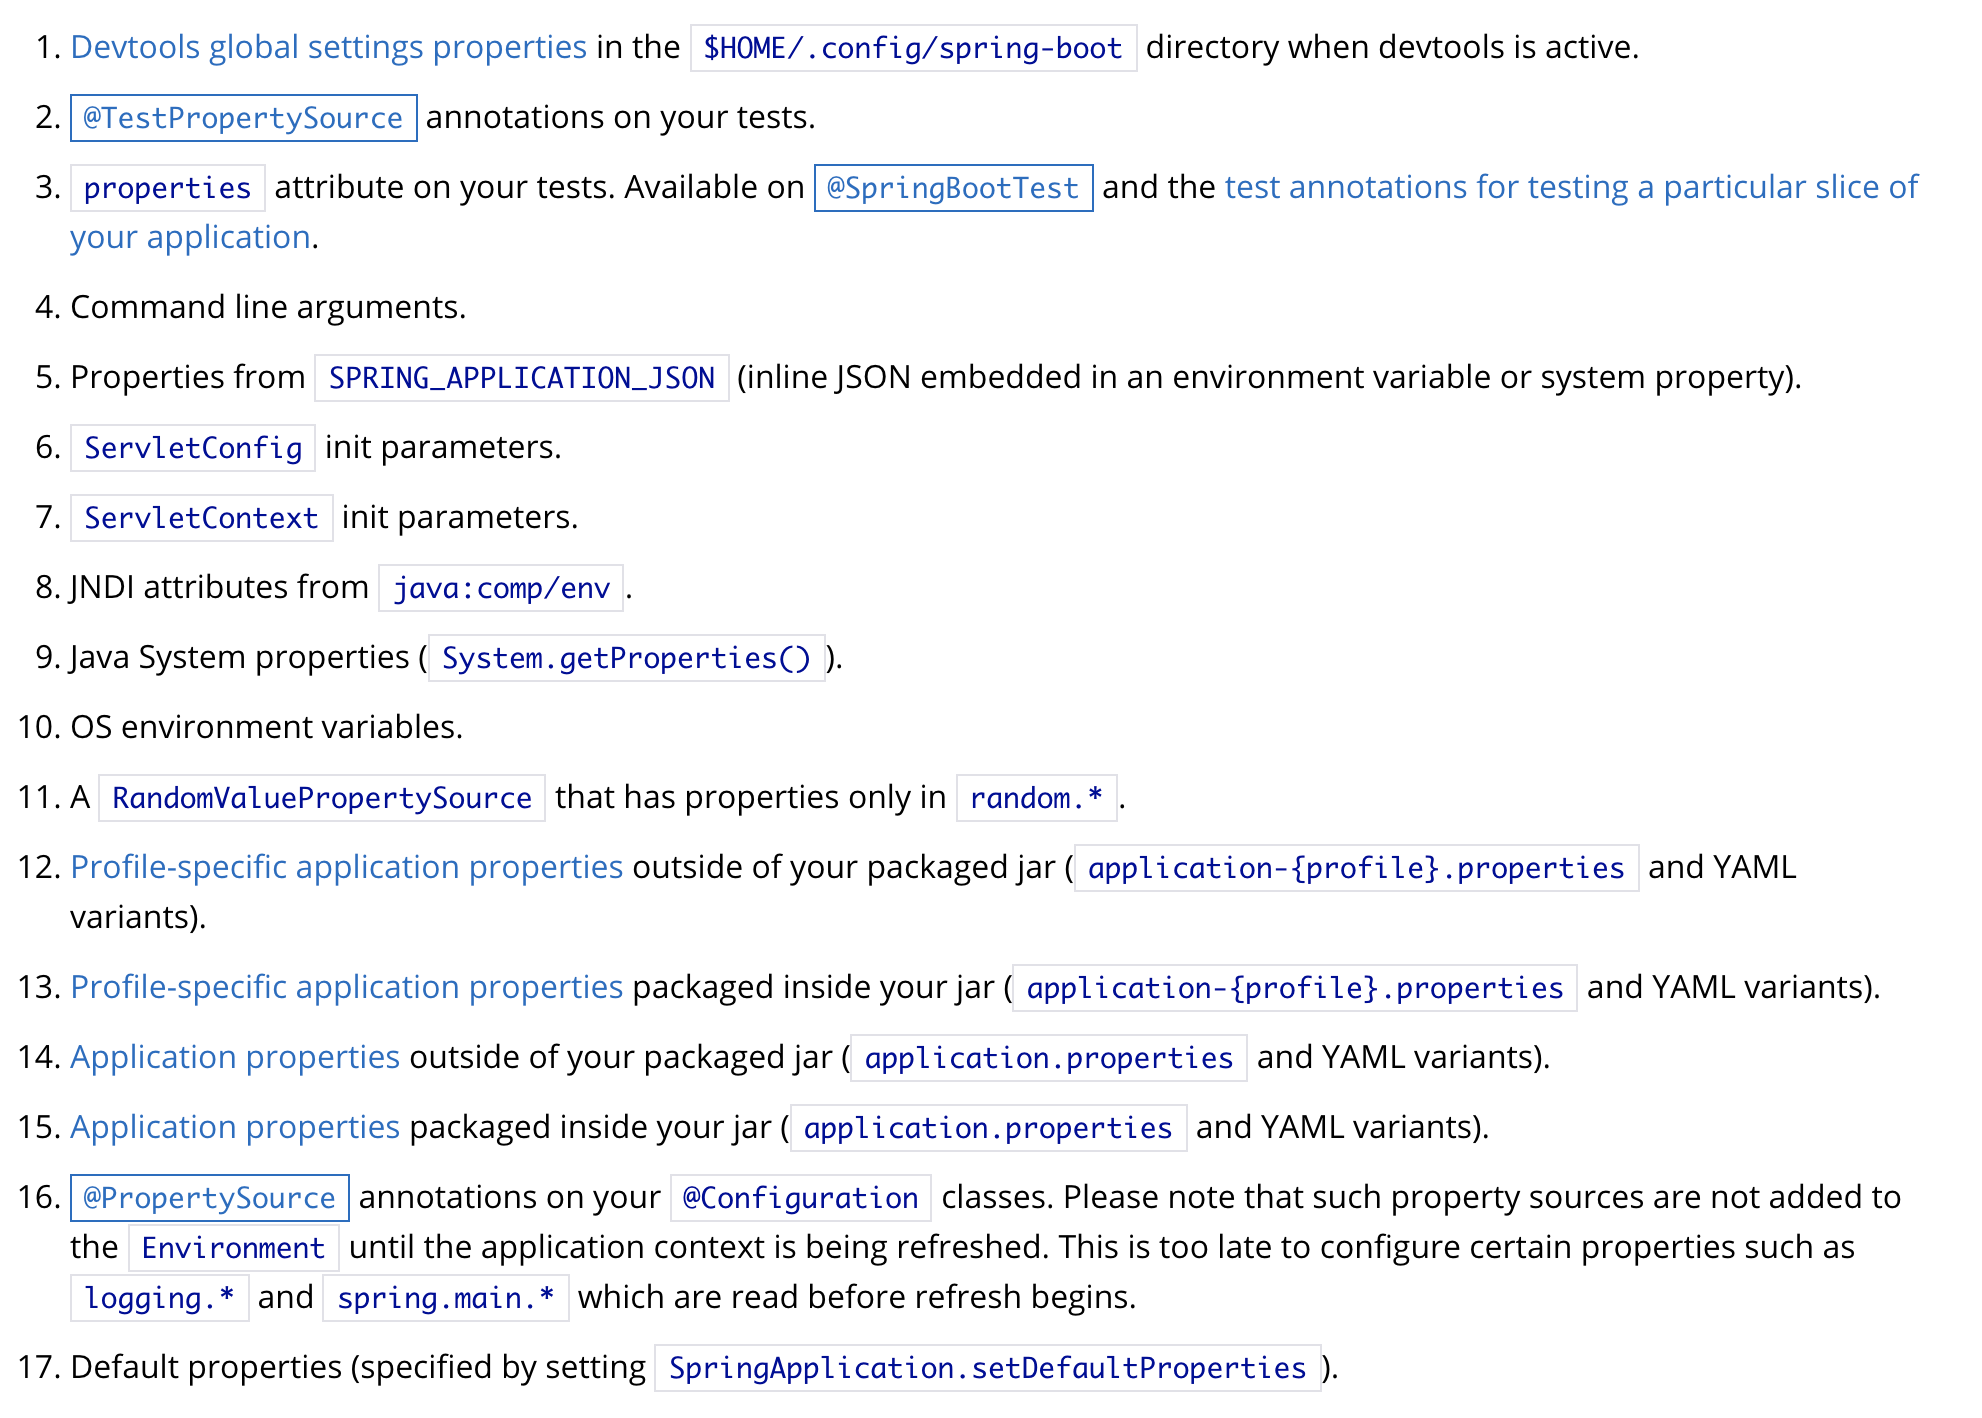
如上图所示,图片是从官网上截取的,这些配置信息都会加载,只不过顺序在前的会覆盖掉后面的
上图的所有配置信息都会以(key,value)的形式加载到Spring中的Environment中,也可以供@Value和@ConfigurationProperties注解使用
本文只介绍在@PropertySource注解导入的、properties文件中的、yml文件中的、操作系统的变量、Java System properties、命令行中的配置信息
配置信息媒介
- 命令行中的配置信息:使用
--,在idea中配置Program arguments,下面是使用命令行来添加
$ java -jar myproject.jar --server.port=8090
- Java System properties:使用
-D,在idea中配置VM options,下面是使用命令行来添加
$ java -jar myproject.jar -Dserver.port=8090
- 操作系统的变量:
vim ~/.bash_profile
在文件中添加 export SERVER_PORT=8090 并保存
source ~/.bash_profile
- properties文件
server.port=8090
spring.profiles.active=dev
- yml文件
server:
  port: 8090
- @PropertySource (在@Configuration下,必须是properties文件,yml文件不支持)
@Configuration
@PropertySource("classpath:config.properties")
public class Config {
}
加载properties文件和yml文件
默认
- properties文件和yml文件都会加载,对于相同属性,我理解properties文件应该会覆盖掉yml文件
- 默认会加载
application.properties和application.yml - 如果没有指定
spring.profiles.active默认会加载application-default.properties和application-default.yml,如果指定了xxx,则加载application-xxx.properties和application-xxx.yml - 会从以下六个默认文件夹找这些配置文件:
file:./config/、file:./config/*/、file:./、classpath:/config/、classpath:/。我理解前三个是jar包外,后两个个是jar包内,jar包外的file文件夹我理解是指执行命令所在的文件夹。 - 优先级:
jar包外application-xxx文件->jar包内application-xxx文件->jar包外application文件->jar包内application文件
指定
spring.config.name修改配置文件名称,也就是不加载application文件了,如果指定了xxx文件,则加载xxx.properties和xxx.yml文件spring.config.location指定特定文件和特定文件夹,不再加载默认文件夹spring.config.additional-location指定特定的文件夹和特定的文件,会加载默认文件夹
spring.config.name and spring.config.location are used very early to determine which files have to be loaded. They must be defined as an environment property (typically an OS environment variable, a system property, or a command-line argument).
只能通过操作系统变量、java system property和命令行来配置才起作用
Relaxed Binding
配置文件中的变量名不用非得与class中的变量名一致,对于点与点之间的变量名,可以使用_、-、驼峰 、大小写这些形式,
userName = user_name = user-name = USERNAME = USER_NAME = USER-NAME
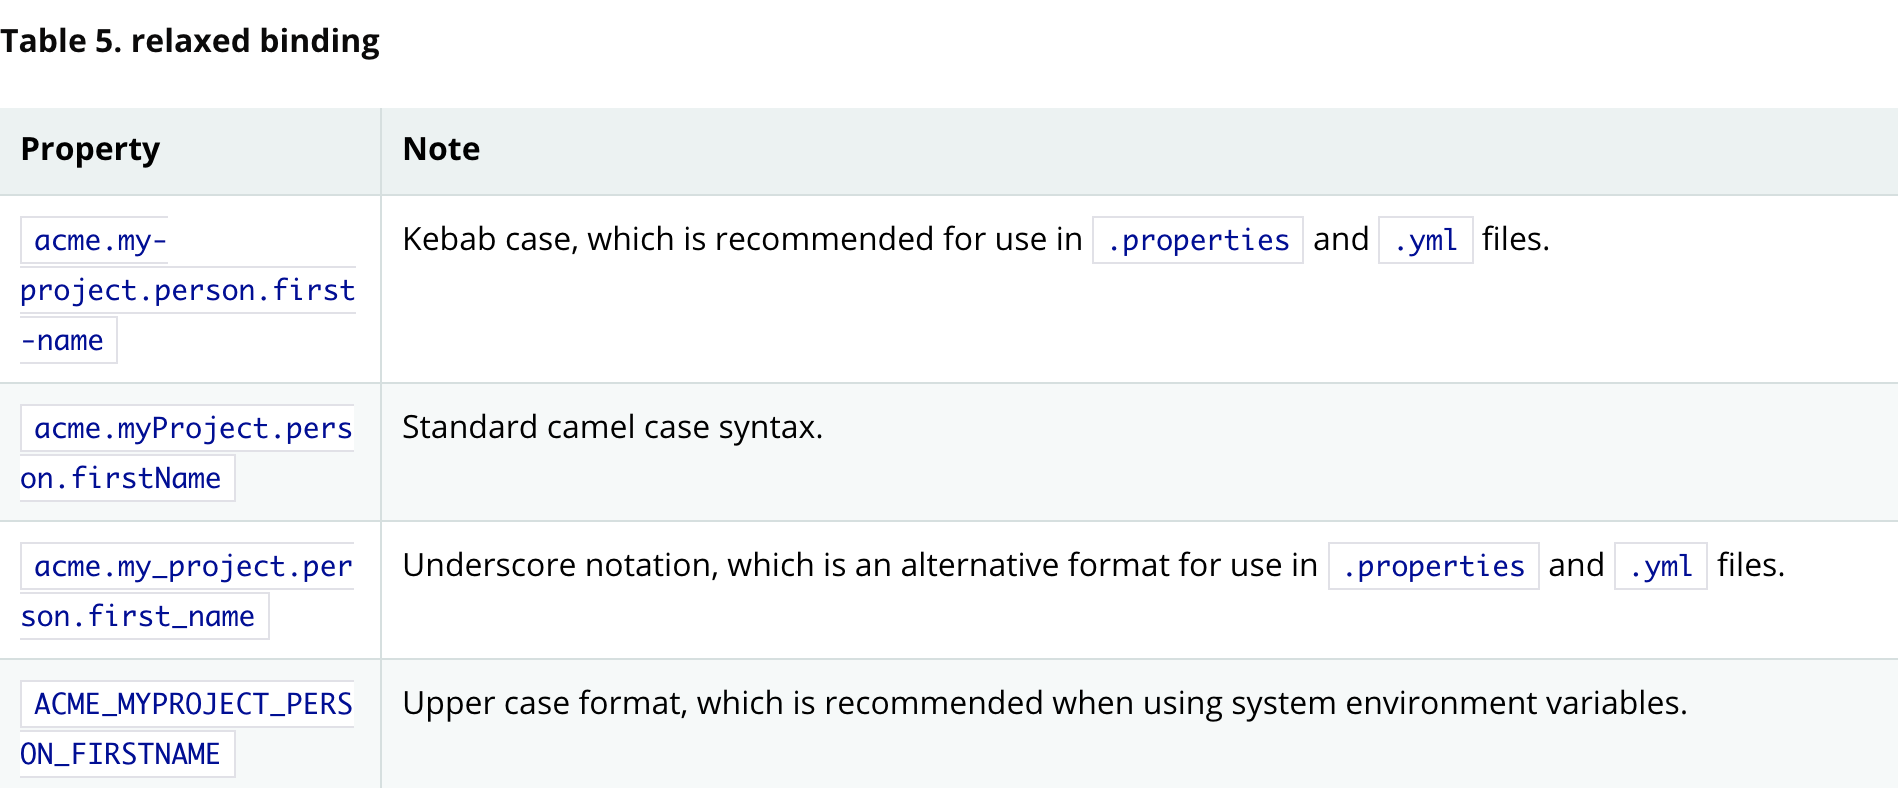
下图是各个形式的实例

The prefix value for the annotation must be in kebab case (lowercase and separated by -, such as acme.my-project.person).
prefix必须使用kebab形式
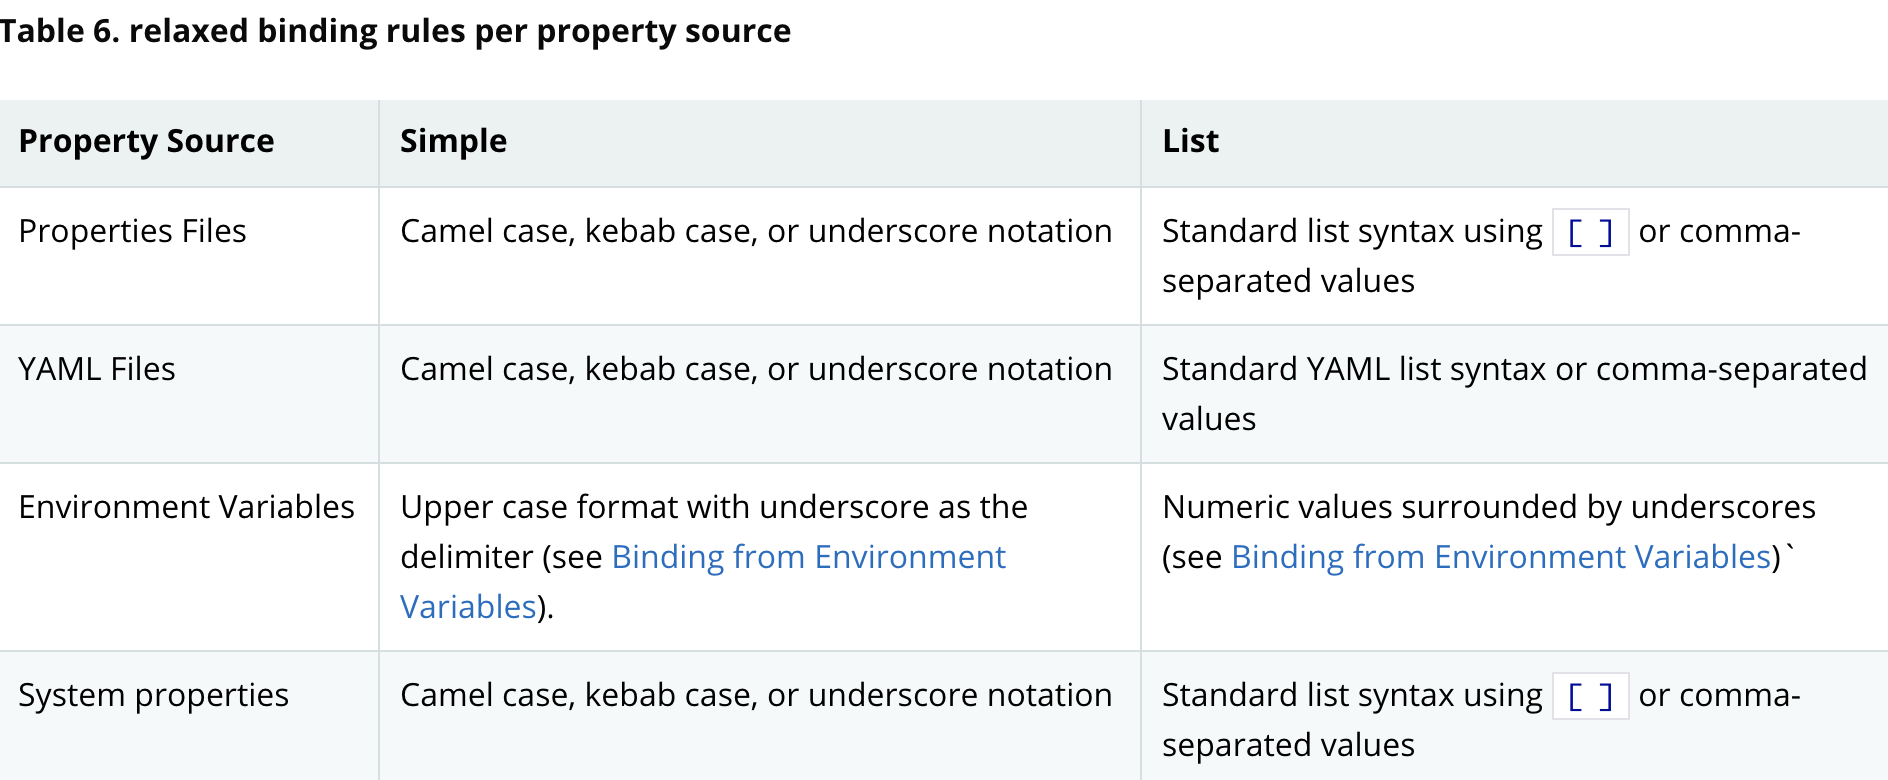
下图是每个文件类型所支持的形式(Upper case format 只适用于操作系统的变量中)

使用配置信息
environment
直接注入

@Autowired
private Environment environment;

environment.getProperty("server.port");
@value
If you do want to use @Value, we recommend that you refer to property names using their canonical form (kebab-case using only lowercase letters). This will allow Spring Boot to use the same logic as it does when relaxed binding @ConfigurationProperties. For example, @Value("{demo.item-price}") will pick up demo.item-price and demo.itemPrice forms from the application.properties file, as well as DEMO_ITEMPRICE from the system environment. If you used @Value("{demo.itemPrice}") instead, demo.item-price and DEMO_ITEMPRICE would not be considered.
建议使用kebab-case形式,这样会配到更多的值
@Component
@Data
public class ValueBean {
    @Value("${server.port}")
    private String serverPort;
}
@ConfigurationProperties
@ConfigurationProperties("server")
@Data
public class ConfigurationPropertiesBean {
    private Integer port;
}
对于想要注入这个类的话,有以下几种方式
使用@EnableConfigurationProperties
@Configuration
@EnableConfigurationProperties({ConfigurationPropertiesBean.class})
public class Config {
}

使用@ConfigurationPropertiesScan
@Configuration
@ConfigurationPropertiesScan({"com.example.demo.spring.boot.externalized.configuration"})
public class Config {
}

使用@component
@ConfigurationProperties("server")
@Data
@Component
public class ConfigurationPropertiesBean {
    private Integer port;
}

使用@Bean
@Bean
@ConfigurationProperties("server")
public ConfigurationPropertiesBean configurationPropertiesBean() {
    return new ConfigurationPropertiesBean();
}
参考
boot-features-external-config
 IDEA激活码


