一、前言
二、订阅/发布(观察者模式)
三、Spring类图分析
四、简单实现(实现ApplicationListener接口)
五、注解驱动@EventListener
六、异步事件
七、泛型支持
八、事件传播机制
九、事物事件@TransactionalEventListener
十、总结
一、前言
说来惭愧,对应Spring事件机制之前只知道实现 ApplicationListener 接口,就可以基于Spring自带的事件做一些事情(如ContextRefreshedEvent),但是最近看公司的wiki基于Spring事件的领域驱动才发现原来还有这么多东西。
二、订阅/发布(观察者模式)
2.1简介
Spring是基于事件驱动模型的,我们常用的MQ就是基于观察者模式设计的。
事件驱动模型也就是我们常说的观察者,或者发布-订阅模型;理解它的几个关键点:
首先是一种对象间的一对多的关系;最简单的如交通信号灯,信号灯是目标(一方),行人注视着信号灯(多方)。
当目标发送改变(发布),观察者(订阅者)就可以接收到改变。
观察者如何处理(如行人如何走,是快走/慢走/不走,目标不会管的), 目标无需干涉;所以就松散耦合了它们之间的关系。
Java API实现和自定义实现观察者模式:
Java提供了两个接口java.util.Observable和java.util.Observer,代码可参考
https://github.com/2YSP/design-pattern/tree/master/src/cn/sp/observer
三、Spring类图分析
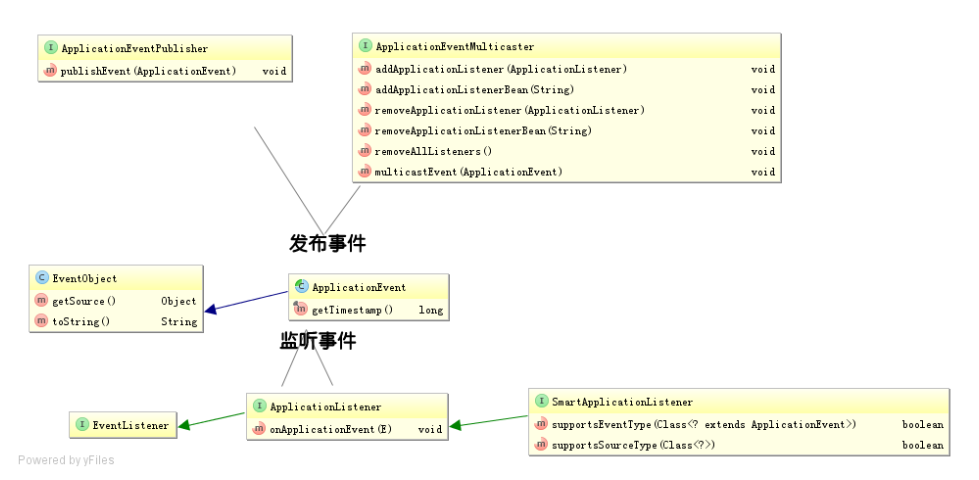
类图
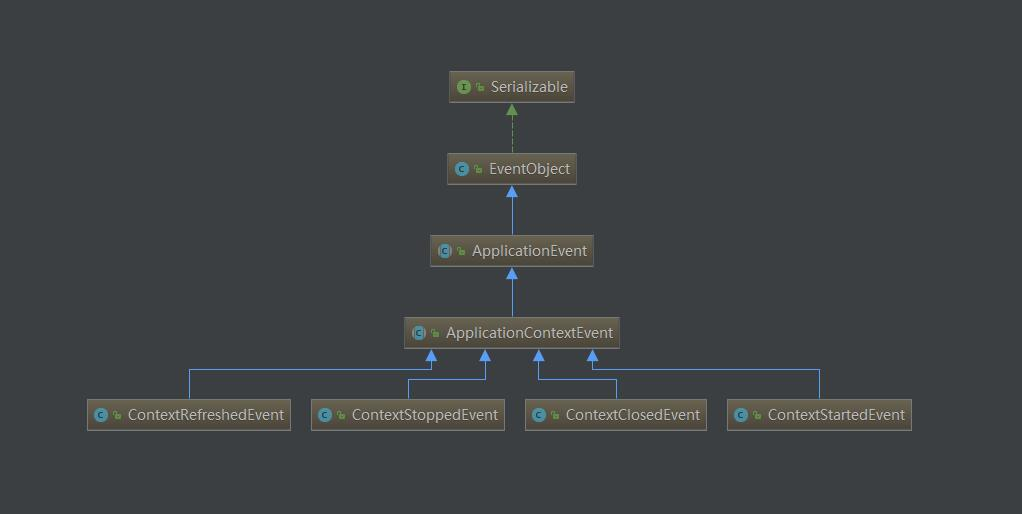
类图
事件发布者
具体代表者是:ApplicationEventPublisher及ApplicationEventMulticaster,系统默认提供了如下实现:
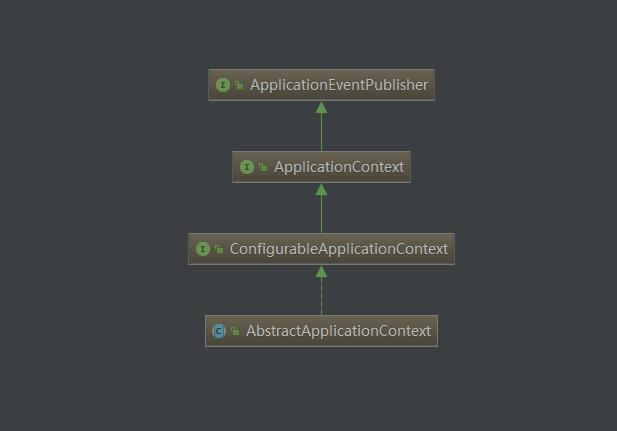
ApplicationEventPublisher类图
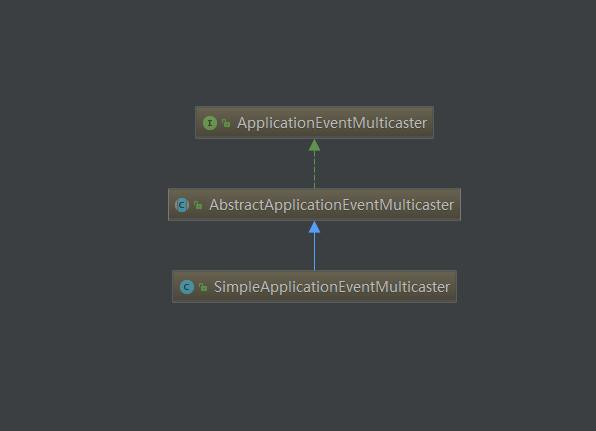
ApplicationEventMulticaster类图
ApplicationContext 接口继承了 ApplicationEventPublisher,并在 AbstractApplicationContext 实现了具体代码,实际执行是委托给ApplicationEventMulticaster(可以认为是多播)
代码如下:
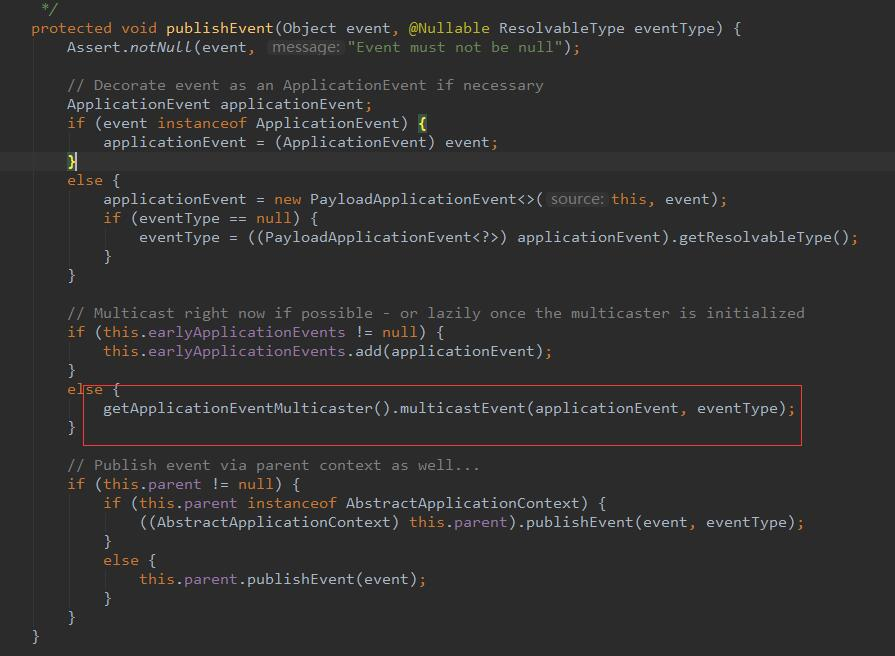
AbstractApplicationContext发布事件代码
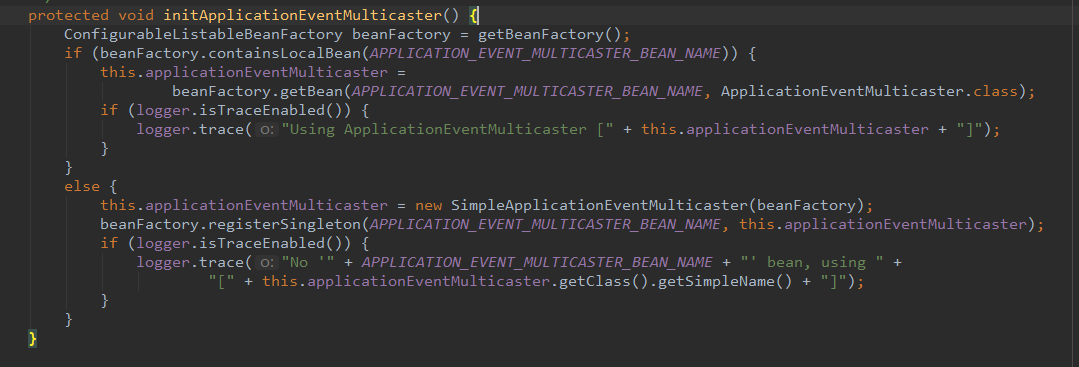
ApplicationEventMulticaster初始化逻辑
根据上面代码可以看出 ApplicationContext 会自动在本地容器找一个ApplicationEventMulticaster的实现,如果没有自己new一个SimpleApplicationEventMulticaster,其中SimpleApplicationEventMulticaster发布事件的代码如下:

发布事件方法
可以看出如果给它一个executor,它就可以实现异步发布事件了,否则就是同步发送。
监听器
ApplicationListener 接口提供了onApplicationEvent方法,但是我们需要在该方法实现内部判断事件类型来处理,也没有提供按顺序触发监听器的语义,所以Spring提供了另一个接口,SmartApplicationListener:
public interface SmartApplicationListener extends ApplicationListener,Ordered{
//如果实现支持该事件类型 那么返回true
boolean supportsEventType(Class<? extends ApplicationEvent> eventType);
//如果实现支持“目标”类型,那么返回true
boolean supportsSourceType(Class<?> sourceType);
//顺序,即监听器执行的顺序,值越小优先级越高
int getOrder();
}
四、简单实现(实现ApplicationListener接口)
场景是我们保存一个订单后发布事件通知,以便做一些其他操作比如锁定商品。
public class Order {
private String orderNo;
private String orderStatus;
private String goods;
private Date createTime;
//省略get、set、toString方法
}
订单创建事件OrderCreateEvent
public class OrderCreateEvent extends ApplicationEvent {
private final Order order;
public OrderCreateEvent(Object source,Order order) {
super(source);
this.order = order;
}
public Order getOrder(){
return order;
}
}
OrderService
@Service
public class OrderService implements ApplicationEventPublisherAware {
private ApplicationEventPublisher applicationEventPublisher;
/**
* 订单保存
*/
public void save(){
String orderNo = getOrderNo();
Order order = new Order();
order.setOrderNo(orderNo);
order.setOrderStatus("待付款");
order.setCreateTime(new Date());
order.setGoods("手机");
System.out.println("订单保存成功:" + order.toString());
//发布事件
applicationEventPublisher.publishEvent(new OrderCreateEvent(this,order));
System.out.println("================");
}
private String getOrderNo() {
String millis = String.valueOf(System.currentTimeMillis());
String str = millis.substring(millis.length() - 7, millis.length() - 1);
return LocalDate.now().format(DateTimeFormatter.ofPattern("yyyyMMdd")) + str;
}
@Override
public void setApplicationEventPublisher(ApplicationEventPublisher applicationEventPublisher) {
this.applicationEventPublisher = applicationEventPublisher;
}
}
监听器OrderCreateEventListener
@Component
public class OrderCreateEventListener implements ApplicationListener<OrderCreateEvent> {
@Override
public void onApplicationEvent(OrderCreateEvent event) {
System.out.printf(this.getClass().getName()+ " -- ApplicationListener 接口实现,订单号[%s]:,锁定商品[%s]\n",
event.getOrder().getOrderNo(), event.getOrder().getGoods());
}
}
运行测试类:
@RunWith(SpringRunner.class)
@SpringBootTest
public class ApplicationEventDemoApplicationTests {
@Autowired
OrderService orderService;
@Test
public void contextLoads() {
orderService.save();
}
}
控制台打印如下则表示成功实现了监听。
五、注解驱动@EventListener
接着上面的,自定义的监听器一定要实现ApplicationListener接口吗?不是,Spring还提供了注解的方式 @EventListener,使用示例如下:
@Component
public class OrderCreateEventListenerAnnotation {
@EventListener
public void createOrderEvent(OrderCreateEvent event){
System.out.println(this.getClass().getName()+"--订单创建事件,
@EventListener注解实现,orderNo:"+event.getOrder().getOrderNo());
}
}
注意:@EventListener有个condition属性,还可以支持条件判断(定义布尔SpEL表达式),只有满足条件才会触发,后面泛型支持那里有示例。
六、异步事件
上面的监听事件都是同步触发的,如果想异步的怎么办?
只需要两步:
启动类上添加 @EnableAsync注解,开启异步支持。
监听方法上添加 @Async注解
七、泛型支持
事件类一定要继承ApplicationEvent吗?
当然不是,我们还可以自定义泛型类实现事件调度(这个是我认为最厉害的地方了)。
写个通用泛型类事件
/**
* 可以自定义泛型类实现事件调度
* Created by 2YSP on 2019/5/30.
*/
public class GenericEvent<T> {
private T data;
private boolean success;
public GenericEvent(T data,boolean success){
this.data = data;
this.success = success;
}
public T getData() {
return data;
}
public void setData(T data) {
this.data = data;
}
public boolean isSuccess() {
return success;
}
public void setSuccess(boolean success) {
this.success = success;
}
}
写个具体类型的事件
public class OrderGenericEvent extends GenericEvent<Order> {
public OrderGenericEvent(Order data, boolean success) {
super(data, success);
}
}
在OrderService的save()方法中发布事件
applicationEventPublisher.publishEvent(new OrderGenericEvent(order,true));
事件处理
@Component
public class OrderGenericEventListener {
@EventListener(condition = "#event.success")
public void orderListener(GenericEvent<Order> event){
System.out.println(this.getClass().getName()+"--处理泛型条件事件。。。");
}
}

success为true时
我们把发布事件的代码改为如下内容再测试,则不会收到事件通知。
applicationEventPublisher.publishEvent(new OrderGenericEvent(order,false));
八、事件传播机制
当我们监听一个事件处理完成时,还需要发布另一个事件,一般我们想到的是调用 ApplicationEventPublisher#publishEvent发布事件方法,但Spring提供了另一种更加灵活的新的事件继续传播机制,监听方法返回一个事件,也就是方法的返回值就是一个事件对象。
示例代码:
public void save(){
String orderNo = getOrderNo();
Order order = new Order();
order.setOrderNo(orderNo);
order.setOrderStatus("待付款");
order.setCreateTime(new Date());
order.setGoods("手机");
System.out.println("订单保存成功:" + order.toString());
//发布事件
// applicationEventPublisher.publishEvent(new OrderCreateEvent(this,order));
applicationEventPublisher.publishEvent(order);
// applicationEventPublisher.publishEvent(new OrderGenericEvent(order,true));
System.out.println("================");
}
订单监听器
@Component
public class OrderListener {
@EventListener
public void orderListener(Order order){
System.out.println(this.getClass().getName() + " -- 监听一个订单");
}
@EventListener
public OrderCreateEvent orderReturnEvent(Order order){
System.out.println(this.getClass().getName() + " -- 监听一个订单,返回一个新的事件 OrderCreateEvent");
return new OrderCreateEvent(this,order);
}
}
启动单元测试,就会发现OrderCreateEventListener也被触发了。
当然还可以返回多个事件,不再举例。
九、事务事件@TransactionalEventListener
从Spring 4.2开始,框架提供了一个新的@TransactionalEventListener注解,它是@EventListener的扩展,允许将事件的侦听器绑定到事务的一个阶段。绑定可以进行以下事务阶段:
AFTER_COMMIT(默认的):在事务成功后触发
AFTER_ROLLBACK:事务回滚时触发
AFTER_COMPLETION:事务完成后触发,不论是否成功
BEFORE_COMMIT:事务提交之前触发
@TransactionalEventListener(phase = BEFORE_COMMIT)
public void txEvent(Order order) {
System.out.println("事物监听");
}
上面代码的意思是仅当存在事件生成器正在运行且即将提交的事务时,才会调用此侦听器。并且,如果没有正在运行的事务,则根本不发送事件,除非我们通过将fallbackExecution 属性设置为true来覆盖它 ,即 @TransactionalEventListener(fallbackExecution = true)。
 IDEA激活码


