文章目录
- 一、Flutter 组件简介
- 二、Flutter 自定义 StatelessWidget 组件流程
-
- 1、导入父类包
- 2、选择继承的父类
- 3、设置成员变量及构造函数
- 4、重写 build 方法
- 5、完整代码示例
- 三、Flutter 自定义 StatefulWidget 组件流程
- 四、使用 final 修饰 Widget 组件成员变量分析
- 五、调用自定义组件
-
- 1、主要方法
- 2、完整代码
- 3、效果展示
- 六、博客资源
一、Flutter 组件简介
Flutter 开发中 , 组件可以是一个 Button 按钮 , Text 文本 , 也可以是封装好的一大块区域 ; 组件由 Widget 组成 ;
二、Flutter 自定义 StatelessWidget 组件流程
1、导入父类包
自定义组件需要继承 StatefulWidget 或 StatelessWidget , 这两个父类组件都在 material.dart 中 , 因此这里先把依赖导入 ;
import 'package:flutter/material.dart';
2、选择继承的父类
自定义组件继承 StatefulWidget 还是 StatelessWidget , 继承哪个组件 , 由组件的性质决定 ;
- 如果 组件 只是纯展示 , 没有交互操作 , 那么继承 StatelessWidget ;
- 如果 组件 需要根据交互内容 , 动态修改内容 , 那么继承 StatefulWidget ;
3、设置成员变量及构造函数
声明组件的成员变量 , 注意成员变量使用 final 修饰 ;
  /// 组件属性必须使用 final 修饰
  ///   所有的 Widget 组件都是不可变的
  final String name;
  final int? age;

  /// Dart 构造函数中 , {} 内的是可选参数 , 可选参数必须在参数的最后
  ///   这里注意 , 可选参数如果定义为非空类型 , 那么必须有一个默认值
  ///   可选参数如果定义为可空类型 , 可以不用进行初始化
  const StudentStatelessWidget({this.name = "Tom", this.age});
4、重写 build 方法
StatelessWidget 中的 build 方法是抽象方法 , 必须实现 Widget build(BuildContext context) 方法 ;
abstract class StatelessWidget extends Widget {
  const StatelessWidget({ Key? key }) : super(key: key);

  @override
  StatelessElement createElement() => StatelessElement(this);

  @protected
  Widget build(BuildContext context);
}
继承 StatefulWidget 或 StatelessWidget 后 , 需要重写其 build 构造方法 ,
在该构造方法中 , 自定义组件行为 , 在这里拼装组件即可 ;
  @override
  Widget build(BuildContext context) {
    return Text("$name : $age");
  }
5、完整代码示例
import 'package:flutter/material.dart';

/// 自定义组件继承 StatefulWidget 还是 StatelessWidget
///   由组件的性质决定
///   如果 组件 只是纯展示 , 没有交互操作 , 那么继承 StatelessWidget
///   如果 组件 需要根据交互内容 , 动态修改内容 , 那么继承 StatefulWidget
///   StatelessWidget 和 StatefulWidget 都需要导入如下包
///   import 'package:flutter/material.dart';
class StudentStatelessWidget extends StatelessWidget{

  /// 组件属性必须使用 final 修饰
  ///   所有的 Widget 组件都是不可变的
  final String name;
  final int? age;

  /// Dart 构造函数中 , {} 内的是可选参数 , 可选参数必须在参数的最后
  ///   这里注意 , 可选参数如果定义为非空类型 , 那么必须有一个默认值
  ///   可选参数如果定义为可空类型 , 可以不用进行初始化
  const StudentStatelessWidget({this.name = "Tom", this.age});

  @override
  Widget build(BuildContext context) {
    return Text("$name : $age");
  }
}
三、Flutter 自定义 StatefulWidget 组件流程
自定义 StatefulWidget 组件 , 导入的包 定义 final 成员变量 与 StatelessWidget 组件相同 ;
StatefulWidget 中 State createState() 方法是抽象的 ;
因此 , StatefulWidget 组件不再实现 Widget build(BuildContext context) 方法 , 而是实现 State createState() 方法 ;
abstract class StatefulWidget extends Widget {

  const StatefulWidget({ Key? key }) : super(key: key);

  @override
  StatefulElement createElement() => StatefulElement(this);

  @protected
  @factory
  State createState(); // ignore: no_logic_in_create_state, this is the original sin
}
State<StatefulWidget> createState() 方法返回值类型 State 需要设置一个泛型 , 说明该 State 是用于哪个 StatefulWidget 组件的 ; 该泛型必须是 StatefulWidget 的子类 ;
@optionalTypeArgs
abstract class State<T extends StatefulWidget> with Diagnosticable {
  @protected
  Widget build(BuildContext context);
}
自定义 State 类必须实现 Widget build(BuildContext context) 抽象方法 ;
实现的 StatefulWidget 的 createState 方法返回值 , 一般需要自定义 State<StatefulWidget> 实现类 ;
State<StatefulWidget> createState()
在该 State<StatefulWidget> 实现类中 , 实现 build 方法 , 返回要显示的组件 ;
/// 该类用于管理组件中的状态
///   需要继承 createState 方法返回值类型 State<StatefulWidget>
///   在该类中 , 调用 setState 方法 , 可以更新组件
class _StudentStatefulWidgetState extends State<StatefulWidget> {

  /// 成员变量
  String name;
  int age;

  /// 构造函数
  _StudentStatefulWidgetState(this.name, this.age);

  @override
  Widget build(BuildContext context) {
    return Text("$name : $age");
  }
}
完整代码示例 :
import 'package:flutter/material.dart';

/// 自定义组件继承 StatefulWidget 还是 StatelessWidget
///   由组件的性质决定
///   如果 组件 只是纯展示 , 没有交互操作 , 那么继承 StatelessWidget
///   如果 组件 需要根据交互内容 , 动态修改内容 , 那么继承 StatefulWidget
///   StatelessWidget 和 StatefulWidget 都需要导入如下包
///   import 'package:flutter/material.dart';
class StudentStatefulWidget extends StatefulWidget{

  /// 组件属性必须使用 final 修饰
  ///   所有的 Widget 组件都是不可变的
  final String name;
  final int? age;

  /// Dart 构造函数中 , {} 内的是可选参数 , 可选参数必须在参数的最后
  ///   这里注意 , 可选参数如果定义为非空类型 , 那么必须有一个默认值
  ///   可选参数如果定义为可空类型 , 可以不用进行初始化
  const StudentStatefulWidget({this.name = "Tom", this.age});

  @override
  State<StatefulWidget> createState() => _StudentStatefulWidgetState(name, age!);
}

/// 该类用于管理组件中的状态
///   需要继承 createState 方法返回值类型 State<StatefulWidget>
///   在该类中 , 调用 setState 方法 , 可以更新组件
class _StudentStatefulWidgetState extends State<StatefulWidget> {

  /// 成员变量
  String name;
  int age;

  /// 构造函数
  _StudentStatefulWidgetState(this.name, this.age);

  @override
  Widget build(BuildContext context) {
    return Text("$name : $age");
  }
}
四、使用 final 修饰 Widget 组件成员变量分析
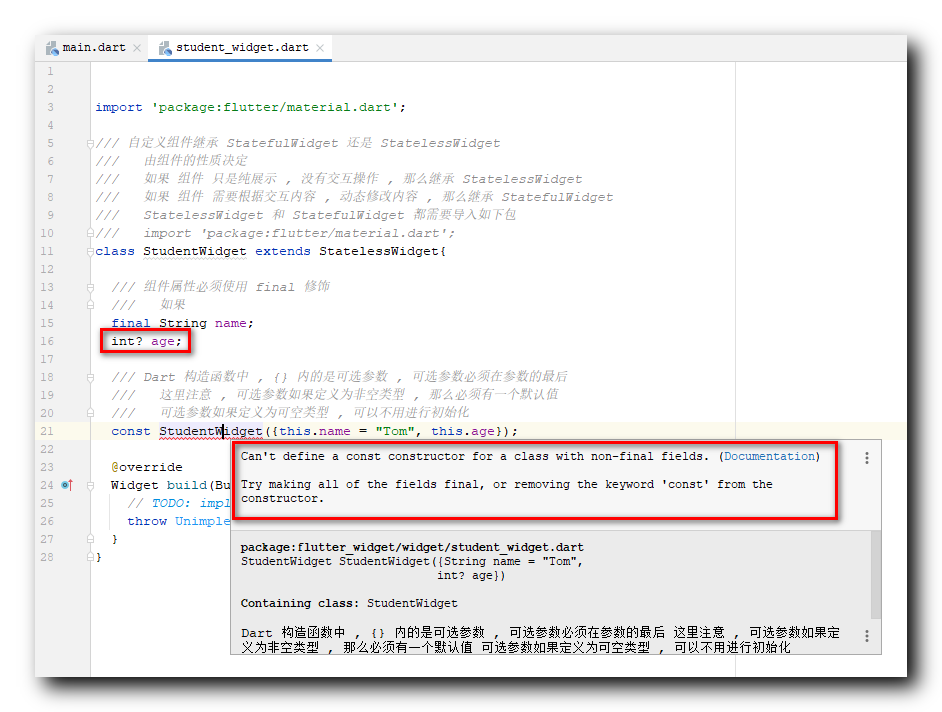
组件属性必须使用 final 修饰 , 如果不使用 final 修饰组件属性 , 会有如下报错 ;
Can't define a const constructor for a class with non-final fields. (Documentation) Try making all of the fields final, or removing the keyword 'const' from the constructor.

我们自定义的 StudentWidget 继承了 StatelessWidget 类 , StatelessWidget 继承了 Widget ;
abstract class StatelessWidget extends Widget {
}
Widget 类由 @immutable 注解修饰 , 被该注解修饰的类 , 该类以及其子类中 的 成员变量都是不可变的 , 即都要被 final 类型修饰 ;
@immutable
abstract class Widget extends DiagnosticableTree {
}
五、调用自定义组件
1、主要方法
在 main.dart 中 , 使用如下代码 , 创建组件 ;
StudentStatelessWidget(
    name: "Tom",
    age: 18
),
StudentStatefulWidget(
    name: "Jerry",
    age: 16
),
2、完整代码
完整代码 :
import 'package:flutter/material.dart';
import 'package:flutter_widget/widget/student_stateful_widget.dart';
import 'package:flutter_widget/widget/student_stateless_widget.dart';

void main() {
  runApp(MyApp());
}

class MyApp extends StatelessWidget {
  @override
  Widget build(BuildContext context) {
    return MaterialApp(
      title: 'Flutter Demo',
      theme: ThemeData(
        primarySwatch: Colors.blue,
      ),
      home: MyHomePage(title: 'Flutter Demo Home Page'),
    );
  }
}

class MyHomePage extends StatefulWidget {
  MyHomePage({Key? key, required this.title}) : super(key: key);
  final String title;

  @override
  _MyHomePageState createState() => _MyHomePageState();
}

class _MyHomePageState extends State<MyHomePage> {
  int _counter = 0;

  void _incrementCounter() {
    setState(() {
      _counter++;
    });
  }

  @override
  Widget build(BuildContext context) {
    return Scaffold(
      appBar: AppBar(
        title: Text(widget.title),
      ),
      body: Center(
        child: Column(
          mainAxisAlignment: MainAxisAlignment.center,
          children: <Widget>[
            StudentStatelessWidget(
                name: "Tom",
                age: 18
            ),

            StudentStatefulWidget(
                name: "Jerry",
                age: 16
            ),

            Text(
              'You have pushed the button this many times:',
            ),
            Text(
              '$_counter',
              style: Theme.of(context).textTheme.headline4,
            ),
          ],
        ),
      ),
      floatingActionButton: FloatingActionButton(
        onPressed: _incrementCounter,
        tooltip: 'Increment',
        child: Icon(Icons.add),
      ), // This trailing comma makes auto-formatting nicer for build methods.
    );
  }
}
3、效果展示
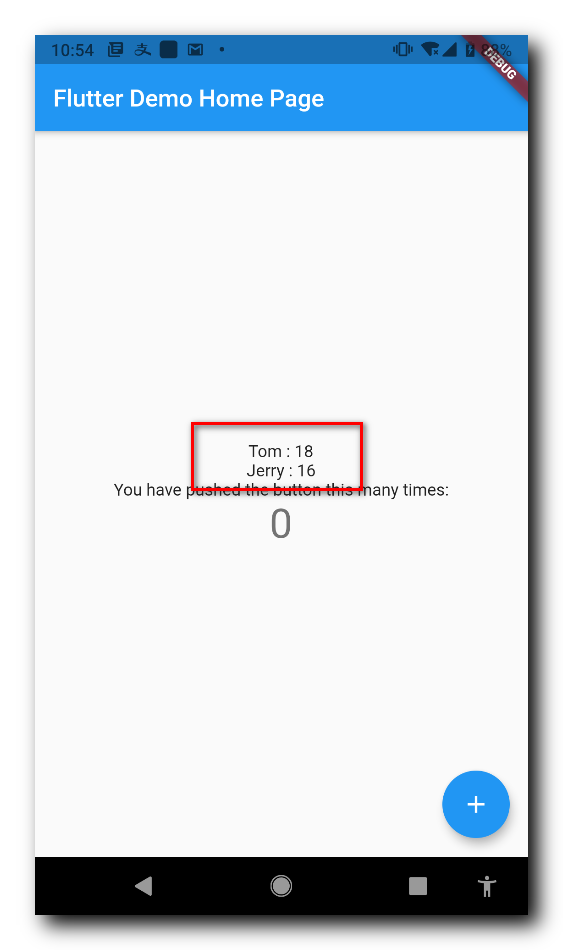
效果展示 : 红色矩形框中是显示的两个组件 ;

六、博客资源
GitHub : https://github.com/han1202012/flutter_widget
 IDEA激活码


