文章目录
- 一、StatefulWidget 组件
- 二、创建 StatefulWidget 组件
- 三、MaterialApp 组件
- 四、Scaffold 组件
- 五、 相关资源
一、StatefulWidget 组件
StatefulWidget 组件是 有状态组件 , 有如下常用的基础组件 :
- MaterialApp : 材料设计 APP 组件 , 通常用作页面的根节点 ;
- Scaffold : Flutter 封装的带有 AppBar , 底部导航栏 BottomNavigationBar , 侧边栏 的组件 , 使用该组件可以很容易实现一个复杂的导航页面 ;
- AppBar : 顶部导航栏 ;
- BottomNavigationBar : 底部导航栏 ;
- RefreshIndicator : 刷新指示器 ;
- Image : 图片组件 ;
- TextField : 输入框组件 ;
- PageView : 可滚动翻页的组件 , 类似于 Android 的 ViewPager ;
二、创建 StatefulWidget 组件
创建空的 dart 文件 StatelessWidgetPage.dart , 导入最基础的材料设计包 ,
import 'package:flutter/material.dart';
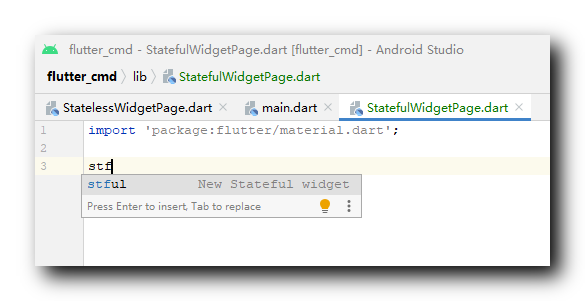
输入 stf 即可提示出 stful 代码模板 , 使用该代码模板创建一个新的 StatelessWidget 组件 ,

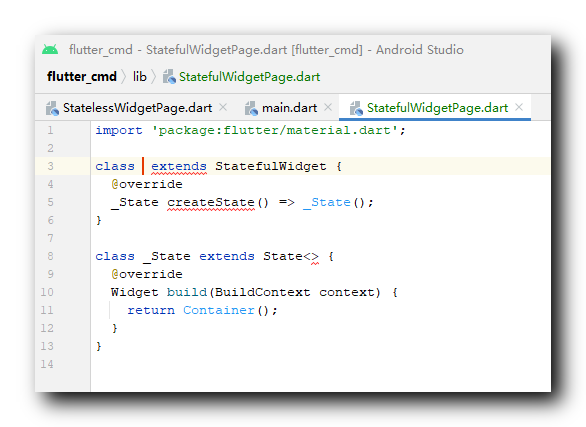
生成的代码模板如下 :
class  extends StatefulWidget {
  @override
  _State createState() => _State();
}

class _State extends State<> {
  @override
  Widget build(BuildContext context) {
    return Container();
  }
}

在光标停留位置 , 输入新的组件名称 , StatefulWidgetPage 名称 , 然后点击回车 , 就可以生成一个新的 StatefulWidget 组件 ;
新生成的代码如下 :
import 'package:flutter/material.dart';

class StatefulWidgetPage extends StatefulWidget {
  @override
  _StatefulWidgetPageState createState() => _StatefulWidgetPageState();
}

class _StatefulWidgetPageState extends State<StatefulWidgetPage> {
  @override
  Widget build(BuildContext context) {
    return Container();
  }
}
在上面的 Widget build(BuildContext context) 方法中 , 创建相关组件 ;
将上述 Widget build(BuildContext context) 方法 , 替换成上一篇博客 【Flutter】StatelessWidget 组件 ( Divider 组件 | Card 组件 | AlertDialog 组件 ) 的 build 方法 , 修改标题为 " " , 完整代码如下 :
import 'package:flutter/material.dart';

class StatefulWidgetPage extends StatefulWidget {
  @override
  _StatefulWidgetPageState createState() => _StatefulWidgetPageState();
}

class _StatefulWidgetPageState extends State<StatefulWidgetPage> {
  // This widget is the root of your application.
  @override
  Widget build(BuildContext context) {

    // 文本组件样式 , 可以设置给 Text 文本组件
    // 设置字体大小 20, 颜色红色
    TextStyle textStyle = TextStyle(fontSize: 20, color: Colors.red);

    return MaterialApp(
      title: 'StatefulWidgetPage 组件示例',
      theme: ThemeData(
        primarySwatch: Colors.blue,
      ),
      home: Scaffold(
        appBar: AppBar(title: Text('StatefulWidgetPage 组件示例'),),

        // Container 容器使用
        body: Container(
          // 设置容器的装饰器 , BoxDecoration 是最常用的装饰器
          // 可以自行查看 BoxDecoration 中可以设置的属性
          decoration: BoxDecoration(color: Colors.grey),

          // 设置 child 子组件居中方式, 居中放置
          alignment: Alignment.center,

          // 子组件, 子组件设置为一个 Column 组件
          child: Column(
            // Column 子组件, 这里设置 Text 文本组件
            children: <Widget>[

              // Text 文本组件
              // textStyle 是之前创建的 TextStyle textStyle 对象
              Text('Container 中的 Text 文本组件示例', style: textStyle,),


              // Icon 图标组件
              Icon(Icons.map, size: 100, color: Colors.green,),

              // 关闭按钮
              CloseButton(),

              // 返回按钮
              BackButton(),

              // Chip 组件
              Chip(
                // Chip 组件的图标
                avatar: Icon(Icons.access_alarm, color: Colors.blue,),
                label: Text('闹钟', style: textStyle,),
              ),

              // Divider 分割线组件
              Divider(
                // 设置分割线容器高度
                height: 20,

                // 分割线左侧间距
                indent: 20,

                // 设置分割线颜色
                color: Colors.red,
              ),

              // Card 组件 : 可设置圆角 , 阴影 , 边框 等效果
              Card(
                // 设置卡片的背景颜色
                color: Colors.green,

                // 设置阴影
                elevation: 5,

                // 设置卡片的边距
                margin: EdgeInsets.all(10),

                // 设置子组件
                child: Container(
                  // 设置边距 10
                  padding: EdgeInsets.all(10),

                  // 设置卡片文字 , 设置卡片文字样式
                  child: Text("卡片文字", style: textStyle,),
                ),

              ),

              // AlertDialog 对话框 , 该弹窗有一个自动圆角和阴影
              AlertDialog(
                // 对话框标题
                title: Text("AlertDialog 对话框标题"),

                // 对话框内容
                content: Text("AlertDialog 对话框内容"),
              ),

            ],
          ),

        ),
      ),
    );
  }
}
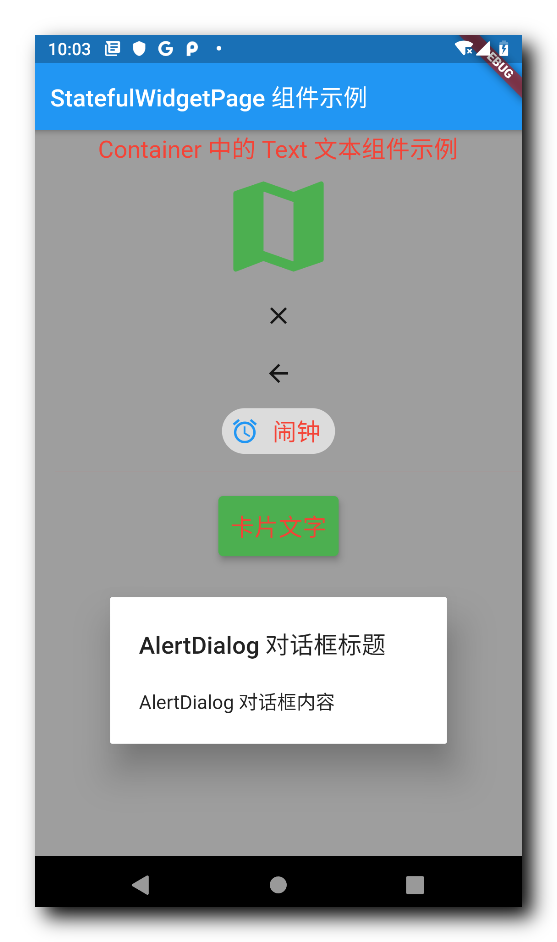
运行效果展示 :

三、MaterialApp 组件
MaterialApp 组件是 材料设计 ( Material Design ) APP 组件 , 通常用作页面的根节点 ;
MaterialApp 组件是 StatefulWidget 的子类 ;
通过 MaterialApp 组件很容易实现符合 Material Design 规范的应用 ;
MaterialApp 组件中的 tittle 字段就是标题设置 , theme 字段设置的是主题 , home 字段设置的是界面的主要子组件 ; 在上述示例中
下面的代码是 MaterialApp 构造函数源码 , 其中构造函数的可选参数就是可设置的选项 :
class MaterialApp extends StatefulWidget {
  /// Creates a MaterialApp.
  ///
  /// At least one of [home], [routes], [onGenerateRoute], or [builder] must be
  /// non-null. If only [routes] is given, it must include an entry for the
  /// [Navigator.defaultRouteName] (`/`), since that is the route used when the
  /// application is launched with an intent that specifies an otherwise
  /// unsupported route.
  ///
  /// This class creates an instance of [WidgetsApp].
  ///
  /// The boolean arguments, [routes], and [navigatorObservers], must not be null.
  const MaterialApp({
    Key key,
    this.navigatorKey,
    this.home,// 主页面组件
    this.routes = const <String, WidgetBuilder>{},
    this.initialRoute,
    this.onGenerateRoute,
    this.onUnknownRoute,
    this.navigatorObservers = const <NavigatorObserver>[],
    this.builder,
    this.title = '',// 标题
    this.onGenerateTitle,
    this.color,
    this.theme,// 主题
    this.darkTheme,
    this.themeMode = ThemeMode.system,
    this.locale,
    this.localizationsDelegates,
    this.localeListResolutionCallback,
    this.localeResolutionCallback,
    this.supportedLocales = const <Locale>[Locale('en', 'US')],
    this.debugShowMaterialGrid = false,
    this.showPerformanceOverlay = false,
    this.checkerboardRasterCacheImages = false,
    this.checkerboardOffscreenLayers = false,
    this.showSemanticsDebugger = false,
    this.debugShowCheckedModeBanner = true,
  }) : assert(routes != null),
       assert(navigatorObservers != null),
       assert(title != null),
       assert(debugShowMaterialGrid != null),
       assert(showPerformanceOverlay != null),
       assert(checkerboardRasterCacheImages != null),
       assert(checkerboardOffscreenLayers != null),
       assert(showSemanticsDebugger != null),
       assert(debugShowCheckedModeBanner != null),
       super(key: key);
}
四、Scaffold 组件
Scaffold 组件是一个完整的页面组件 , 封装有 AppBar , 底部导航栏 BottomNavigationBar , 侧边栏组件 , 使用该组件可以很容易实现一个复杂的导航页面 ;
Scaffold 组件常用设置选项 :
- 顶部标题栏设置 : appBar ;
- 界面主体子组件设置 : body ;
- 悬浮按钮设置 : floatingActionButton ;
- 底部导航栏设置 : bottomNavigationBar ;
- 侧边栏设置 : drawer ;
Scaffold 组件构造函数源码 : 构造函数中的可选参数就是组件的可设置选项 ;
class Scaffold extends StatefulWidget {
  /// Creates a visual scaffold for material design widgets.
  const Scaffold({
    Key key,
    this.appBar,// 顶部标题栏设置
    this.body,// 界面主体组件设置
    this.floatingActionButton,// 悬浮按钮设置
    this.floatingActionButtonLocation,
    this.floatingActionButtonAnimator,
    this.persistentFooterButtons,
    this.drawer,// 侧边栏
    this.endDrawer,
    this.bottomNavigationBar,// 底部导航栏
    this.bottomSheet,
    this.backgroundColor,
    this.resizeToAvoidBottomPadding,
    this.resizeToAvoidBottomInset,
    this.primary = true,
    this.drawerDragStartBehavior = DragStartBehavior.start,
    this.extendBody = false,
    this.extendBodyBehindAppBar = false,
    this.drawerScrimColor,
    this.drawerEdgeDragWidth,
  }) : assert(primary != null),
       assert(extendBody != null),
       assert(extendBodyBehindAppBar != null),
       assert(drawerDragStartBehavior != null),
       super(key: key);
}
五、 相关资源
参考资料 :
- Flutter 官网 : https://flutter.dev/
- Flutter 开发文档 : https://flutter.cn/docs ( 强烈推荐 )
- 官方 GitHub 地址 : https://github.com/flutter
- Flutter 中文社区 : https://flutter.cn/
- Flutter 实用教程 : https://flutter.cn/docs/cookbook
- Flutter CodeLab : https://codelabs.flutter-io.cn/
- Dart 中文文档 : https://dart.cn/
- Dart 开发者官网 : https://api.dart.dev/
- Flutter 中文网 ( 非官方 , 翻译的很好 ) : https://flutterchina.club/ , http://flutter.axuer.com/docs/
- Flutter 相关问题 : https://flutterchina.club/faq/ ( 入门阶段推荐看一遍 )
博客源码下载 :
-
GitHub 地址 : https://github.com/han1202012/flutter_cmd ( 随博客进度一直更新 , 有可能没有本博客的源码 )
-
博客源码快照 : https://download.csdn.net/download/han1202012/15484718 ( 本篇博客的源码快照 , 可以找到本博客的源码 )
 IDEA激活码


