SpringCloud
- Bus消息总线
-
- Bus消息总线是什么
- 能干嘛
- 为何被称为总线
- Bus之RabbitMQ环境配置
- Bus动态刷新全局广播的设计思想和选型
-
- 设计思想
- Bus动态刷新全局广播配置实现
- Bus动态刷新定点通知
- 通知总结
- 原理探究
-
- 核心流程
- 整合bus后的原理分析
- 推荐文章
Bus消息总线
Bus消息总线是什么
一言以蔽之,分布式自动刷新配置功能。
是什么
Spring Cloud Bus 配合Spring Cloud Config 使用可以实现配置的动态刷新。

Spring Cloud Bus是用来将分布式系统的节点与轻量级消息系统链接起来的框架,它整合了Java的事件处理机制和消息中间件的功能。
Spring Clud Bus目前支持RabbitMQ和Kafka。
能干嘛
Spring Cloud Bus能管理和传播分布式系统间的消息,就像一个分布式执行器,可用于广播状态更改、事件推送等,也可以当作微服务间的通信通道。

为何被称为总线
什么是总线
在微服务架构的系统中,通常会使用轻量级的消息代理来构建一个共用的消息主题,并让系统中所有微服务实例都连接上来。由于该主题中产生的消息会被所有实例监听和消费,所以称它为消息总线。在总线上的各个实例,都可以方便地广播一些需要让其他连接在该主题上的实例都知道的消息。
基本原理
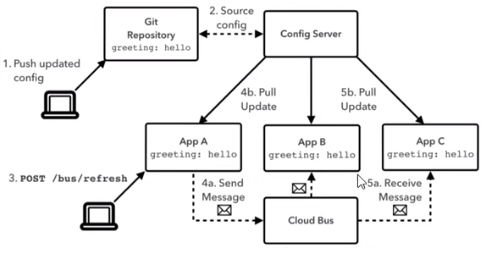
ConfigClient实例都监听MQ中同一个topic(默认是Spring Cloud Bus)。当一个服务刷新数据的时候,它会把这个信息放入到Topic中,这样其它监听同一Topic的服务就能得到通知,然后去更新自身的配置。
Bus之RabbitMQ环境配置
Linux下安装MQ
MQ的linux安装
windows下安装MQ
- 安装Erlang,下载地址:http://erlang.org/download/otp_win64_21.3.exe
- 安装RabbitMQ,下载地址:https://github.com/rabbitmq/rabbitmq-server/releases/download/v3.8.3/rabbitmq-server-3.8.3.exe
- 打开cmd进入RabbitMQ安装目录下的sbin目录,如:D:\devSoft\RabbitMQ Scrverk\rabbitmq_server-3.7.14\sbin
- 输入以下命令启动管理功能
- rabbitmq-plugins enable rabbitmq _management
- 这样就可以添加可视化插件。
- 访问地址查看是否安装成功:http://localhost:15672/
- 输入账号密码并登录:guest guest
Bus动态刷新全局广播的设计思想和选型
必须先具备良好的RabbitMQ环境先
演示广播效果,增加复杂度,再以3355为模板再制作一个3366
1.新建cloud-config-client-3366
2.POM
<?xml version="1.0" encoding="UTF-8"?>
<project xmlns="http://maven.apache.org/POM/4.0.0"
         xmlns:xsi="http://www.w3.org/2001/XMLSchema-instance"
         xsi:schemaLocation="http://maven.apache.org/POM/4.0.0 http://maven.apache.org/xsd/maven-4.0.0.xsd">
    <parent>
        <artifactId>cloud_Parent</artifactId>
        <groupId>dhy.xpy</groupId>
        <version>520.521.finally</version>
    </parent>
    <modelVersion>4.0.0</modelVersion>

    <artifactId>cloud-config-client-3366</artifactId>

    <properties>
        <maven.compiler.source>8</maven.compiler.source>
        <maven.compiler.target>8</maven.compiler.target>
    </properties>

    <dependencies>
        <!--添加消息总线RabbitMQ支持-->
        <dependency>
            <groupId>org.springframework.cloud</groupId>
            <artifactId>spring-cloud-starter-bus-amqp</artifactId>
        </dependency>
        <dependency>
            <groupId>org.springframework.cloud</groupId>
            <artifactId>spring-cloud-starter-config</artifactId>
        </dependency>
        <dependency>
            <groupId>org.springframework.cloud</groupId>
            <artifactId>spring-cloud-starter-netflix-eureka-client</artifactId>
        </dependency>
        <dependency>
            <groupId>org.springframework.boot</groupId>
            <artifactId>spring-boot-starter-web</artifactId>
        </dependency>
        <dependency>
            <groupId>org.springframework.boot</groupId>
            <artifactId>spring-boot-starter-actuator</artifactId>
        </dependency>

        <dependency>
            <groupId>org.springframework.boot</groupId>
            <artifactId>spring-boot-devtools</artifactId>
            <scope>runtime</scope>
            <optional>true</optional>
        </dependency>
        <dependency>
            <groupId>org.projectlombok</groupId>
            <artifactId>lombok</artifactId>
            <optional>true</optional>
        </dependency>
        <dependency>
            <groupId>org.springframework.boot</groupId>
            <artifactId>spring-boot-starter-test</artifactId>
            <scope>test</scope>
        </dependency>
    </dependencies>
</project>
3.YML
这里是bootstrap.yml
server:
  port: 3366

spring:
  application:
    name: config-client
  cloud:
    #Config客户端配置
    config:
      label: master #分支名称
      name: config #配置文件名称
      profile: dev #读取后缀名称   上述3个综合:master分支上config-dev.yml的配置文件被读取http://config-3344.com:3344/master/config-dev.yml
      uri: http://localhost:3344 #配置中心地址

  #rabbitmq相关配置 15672是Web管理界面的端口;5672是MQ访问的端口
  rabbitmq:
    host: localhost
    port: 5672
    username: admin
    password: 123

#服务注册到eureka地址
eureka:
  client:
    service-url:
      defaultZone: http://localhost:7001/eureka

# 暴露监控端点
management:
  endpoints:
    web:
      exposure:
        include: "*"
4.主启动
import org.springframework.boot.SpringApplication;
import org.springframework.boot.autoconfigure.SpringBootApplication;
import org.springframework.cloud.netflix.eureka.EnableEurekaClient;

@EnableEurekaClient
@SpringBootApplication
public class ConfigClientMain3366
{
    public static void main(String[] args)
    {
        SpringApplication.run(ConfigClientMain3366.class,args);
    }
}
5.controller
@RestController
@RefreshScope
public class ConfigClientController
{
    @Value("${server.port}")
    private String serverPort;

    @Value("${config.info}")
    private String configInfo;

    @GetMapping("/configInfo")
    public String configInfo()
    {
        return "serverPort: "+serverPort+"\t\n\n configInfo: "+configInfo;
    }

}
设计思想
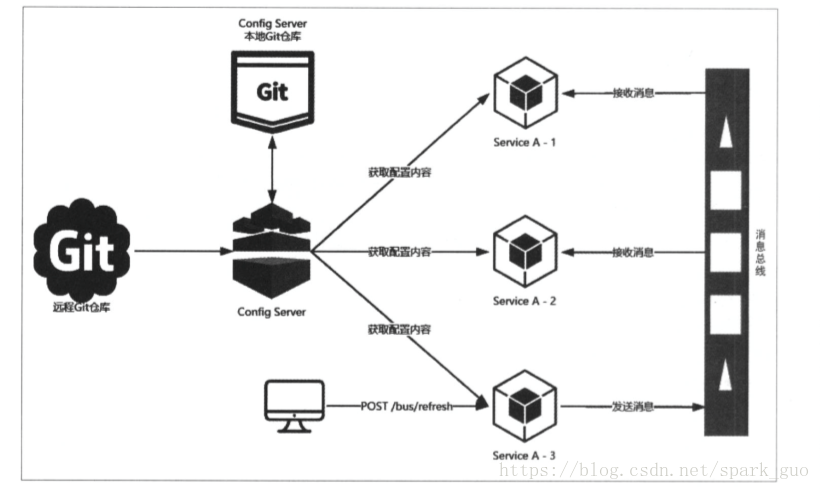
1.利用消息总线触发一个客户端/bus/refresh,而刷新所有客户端的配置

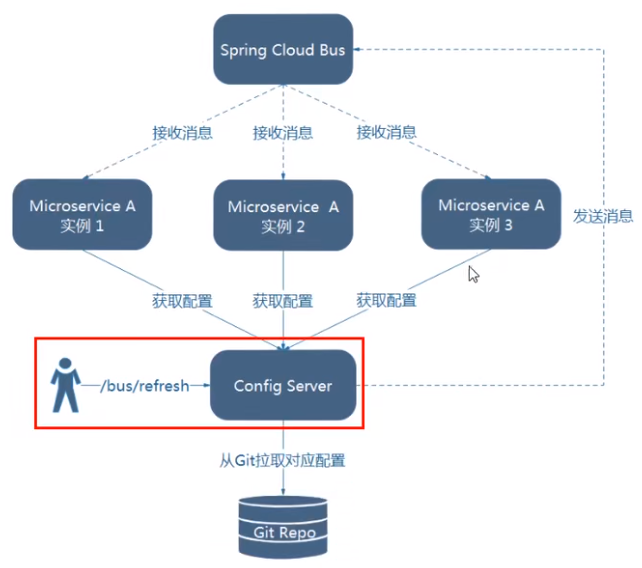
2.利用消息总线触发一个服务端ConfigServer的/bus/refresh端点,而刷新所有客户端的配置

图二的架构显然更加适合,图—不适合的原因如下:
- 打破了微服务的职责单一性,因为微服务本身是业务模块,它本不应该承担配置刷新的职责。
- 破坏了微服务各节点的对等性。
- 有一定的局限性。例如,微服务在迁移时,它的网络地址常常会发生变化,此时如果想要做到自动刷新,那就会增加更多的修改。
Bus动态刷新全局广播配置实现
给cloud-config-center-3344配置中心服务端添加消息总线支持
POM
<!--添加消息总线RabbitNQ支持-->
<dependency>
	<groupId>org.springframework.cloud</groupId>
	<artifactId>spring-cloud-starter-bus-amap</artifactId>
</dependency>
<dependency>
	<groupId>org-springframework.boot</groupId>
	<artifactId>spring-boot-starter-actuator</artifactId>
</dependency>
YML
server:
  port: 3344

spring:
  application:
    name:  cloud-config-center #注册进Eureka服务器的微服务名
  cloud:
    config:
      server:
        git:
          uri: https://gitee.com/DaHuYuXiXi/springcloud-config.git #GitHub上面的git仓库名字
          ####搜索目录
          search-paths:
            - springcloud-config
      ####读取分支
      label: master
#rabbitmq相关配置
  rabbitmq:
   host: 192.168.112.128
   port: 5672
   username: admin
   password: 123

#服务注册到eureka地址
eureka:
  client:
    service-url:
      defaultZone: http://localhost:7001/eureka

##rabbitmq相关配置,暴露bus刷新配置的端点
management:
  endpoints: #暴露bus刷新配置的端点
    web:
      exposure:
        include: 'bus-refresh'
给cloud-config-client-3355客户端添加消息总线支持
POM
<!--添加消息总线RabbitNQ支持-->
<dependency>
	<groupId>org.springframework.cloud</groupId>
	<artifactId>spring-cloud-starter-bus-amap</artifactId>
</dependency>
<dependency>
	<groupId>org-springframework.boot</groupId>
	<artifactId>spring-boot-starter-actuator</artifactId>
</dependency>
YML
server:
  port: 3355

spring:
  application:
    name: config-client
  cloud:
    #Config客户端配置
    config:
      label: master #分支名称
      name: config #配置文件名称
      profile: dev #读取后缀名称   上述3个综合:master分支上config-dev.yml的配置文件被读取http://config-3344.com:3344/master/config-dev.yml
      uri: http://localhost:3344 #配置中心地址k

  #rabbitmq相关配置 15672是Web管理界面的端口;5672是MQ访问的端口
  rabbitmq:
    host: 192.168.112.128
    port: 5672
    username: admin
    password: 123

#服务注册到eureka地址
eureka:
  client:
    service-url:
      defaultZone: http://localhost:7001/eureka

# 暴露监控端点
management:
  endpoints:
    web:
      exposure:
        include: "*"
给cloud-config-client-3366客户端添加消息总线支持
POM
<!--添加消息总线RabbitNQ支持-->
<dependency>
	<groupId>org.springframework.cloud</groupId>
	<artifactId>spring-cloud-starter-bus-amap</artifactId>
</dependency>
<dependency>
	<groupId>org-springframework.boot</groupId>
	<artifactId>spring-boot-starter-actuator</artifactId>
</dependency>
YML
server:
  port: 3366

spring:
  application:
    name: config-client
  cloud:
    #Config客户端配置
    config:
      label: master #分支名称
      name: config #配置文件名称
      profile: dev #读取后缀名称   上述3个综合:master分支上config-dev.yml的配置文件被读取http://config-3344.com:3344/master/config-dev.yml
      uri: http://localhost:3344 #配置中心地址

  #rabbitmq相关配置 15672是Web管理界面的端口;5672是MQ访问的端口
  rabbitmq:
    host: 192.168.112.128
    port: 5672
    username: admin
    password: 123

#服务注册到eureka地址
eureka:
  client:
    service-url:
      defaultZone: http://localhost:7001/eureka

# 暴露监控端点
management:
  endpoints:
    web:
      exposure:
        include: "*"
测试
启动
- EurekaMain7001
- ConfigcenterMain3344
- ConfigclientMain3355
- ConfigclicntMain3366

运维工程师
-
修改Github上配置文件内容,增加版本号

-
发送POST请求
curl -X POST "http://localhost:3344/actuator/bus-refresh"
—次发送,处处生效

配置中心
http://localhost:3344/config-dev.yml
客户端
- http://localhost:3355/configInfo
- http://localhost:3366/configInfo
- 获取配置信息,发现都已经刷新了


Bus动态刷新定点通知
不想全部通知,只想定点通知
- 只通知3355
- 不通知3366
简单一句话 - 指定具体某一个实例生效而不是全部
公式:http://localhost:3344/actuator/bus-refresh/{destination}--->微服务名称+端口号
/bus/refresh请求不再发送到具体的服务实例上,而是发给config server通过destination参数类指定需要更新配置的服务或实例
案例
- 我们这里以刷新运行在3355端口上的config-client(配置文件中设定的应用名称)为例,只通知3355,不通知3366
curl -X POST "http://localhost:3344/actuator/bus-refresh/config-client:3355
通知总结

原理探究
spring cloud bus与spring cloud config的整合,并以RabbitMq作为消息代理,实现了应用配置的动态更新。
首先之前我们是对每一个微服务都单独发送一个post请求,刷新对应微服务的端口最新信息,完成手动刷新,现在我们有两种方案,可以完成广播刷新:

向service A的实例3发送post请求,访问/bus/refresh接口,此时,service A的实例3就会将刷新请求发送到消息总线上,该消息事件会被service A的实例1和实例2从总线中获取到,并重新从config server中获取它们的配置信息,从而实现配置信息的动态更新。

1.在config server中引入 spring cloud bus,将配置服务端也加入到消息总线中来;
2./bus/refresh请求不再发送到具体服务实例上,而是发送给Config Server,并通过destination参数指定需要更新配置的服务或实例。
我们采用了第二种方案,那么第二种方案的原理又是什么呢?
核心流程
Spring Cloud 默认实现了配置中心动态刷新的功能,在公共模块 spring-cloud-context 包中。目前比较流行的配置中心 Spring Cloud Config 动态刷新便是依赖此模块,而Nacos动态刷新机制是在此模块上做了扩展,比Spring Cloud Config功能更强大丰富。
首先 Spring Cloud Config 动态刷新需要依赖 Spring Cloud Bus,而 Nacos 则是在后台修改后直接推送到各服务。
其次,Spring Cloud Config的刷新机制针对所有修改的变量,只有有改动,后台就会获取。
而Nacos则是支持粒度更细的方式,只有 refresh 属性为 true 的配置项,才会在运行的过程中变更为新的值。这时Nacos特有的方式。
相同点:两种配置中心动态刷新的范围都是以下两种:
- @ConfigurationProperties 注解的配置类
- @RefreshScope 注解的bean
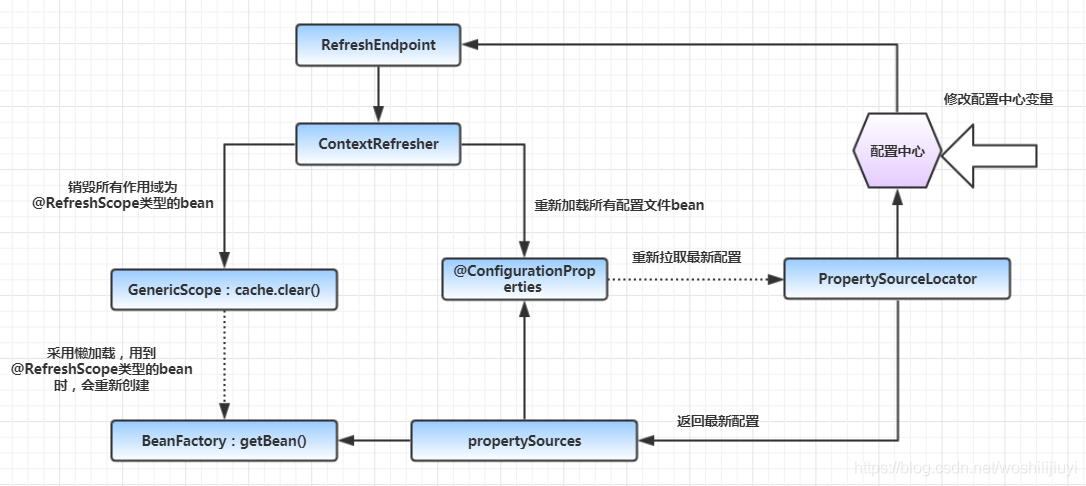
大致的核心流程如下:

分别看一下这两点的实现原理。
首先 spring cloud config 动态刷新功能通过以下变量来确定是否开启,默认为true。
显然默认spring cloud config动态刷新功能是默认开启的
@ConditionalOnProperty(value = “endpoints.refresh.enabled”, matchIfMissing = true)
RefreshEndpoint 端点暴露方式:
@Configuration(
    proxyBeanMethods = false
)
@AutoConfigureAfter({WebMvcAutoConfiguration.class})
public class LifecycleMvcEndpointAutoConfiguration {
    public LifecycleMvcEndpointAutoConfiguration() {
    }

    @Bean
    @ConditionalOnMissingBean
    public EnvironmentManager environmentManager(ConfigurableEnvironment environment) {
        return new EnvironmentManager(environment);
    }
}

// Mvc适配器
public class GenericPostableMvcEndpoint extends EndpointMvcAdapter {

	//代理类为RefreshEndpoint
	public GenericPostableMvcEndpoint(Endpoint<?> delegate) {
		super(delegate);
	}

    //当我们访问refresh端点时,必须发送post请求
	@RequestMapping(method = RequestMethod.POST)
	@ResponseBody
	@Override
	public Object invoke() {
	     //如果当前RefreshEndpoint功能未开启,则向页面输出端点不可用的信息
	     //http状态为未找到
		if (!getDelegate().isEnabled()) {
			return new ResponseEntity<>(Collections.singletonMap(
					"message", "This endpoint is disabled"), HttpStatus.NOT_FOUND);
		}
		//否则调用EndpointMvcAdapter的invoke方法
		//其实调用的就是下面RefreshEndpoint 的invoke方法
		return super.invoke();
	}
}
这里的实现方式同 springboot actuator endpoint原理一样,都是通过 EndpointMvcAdapter 适配器来代理实现。
RefreshEndpoint 端点:
一起的版本:
public class RefreshEndpoint extends AbstractEndpoint<Collection<String>> {

	private ContextRefresher contextRefresher;

	public String[] refresh() {
		Set<String> keys = contextRefresher.refresh();
		return keys.toArray(new String[keys.size()]);
	}

	@Override
	public Collection<String> invoke() {
		return Arrays.asList(refresh());
	}
}
现在的版本:
@Endpoint(
    id = "refresh"
)
public class RefreshEndpoint {
    private ContextRefresher contextRefresher;

    public RefreshEndpoint(ContextRefresher contextRefresher) {
        this.contextRefresher = contextRefresher;
    }

     //向当前端点写入最新的信息
    @WriteOperation
    public Collection<String> refresh() {
       //刷新环境,获取最新的信息
        Set<String> keys = this.contextRefresher.refresh();
        return keys;
    }
}
具体的刷新逻辑在 ContextRefresher 中。
配置ContextRefresher 刷新类:
public class ContextRefresher {
	//......

	private ConfigurableApplicationContext context;
	private RefreshScope scope;

	public synchronized Set<String> refresh() {
		//提取之前的属性配置
		Map<String, Object> before = extract(
				this.context.getEnvironment().getPropertySources());
		//获取最新的属性配置
		addConfigFilesToEnvironment();
		//获取发生变化的属性
		Set<String> keys = changes(before,
				extract(this.context.getEnvironment().getPropertySources())).keySet();
		//发布EnvironmentChangeEvent事件
		this.context.publishEvent(new EnvironmentChangeEvent(keys));
		//刷新 RefreshScope Bean
		this.scope.refreshAll();
		return keys;
	}
	//......
}
addConfigFilesToEnvironment();上述代码通过该方法重新获取配置:
//获取最新的属性配置
private void addConfigFilesToEnvironment() {
		ConfigurableApplicationContext capture = null;
		try {
			StandardEnvironment environment = copyEnvironment(
					this.context.getEnvironment());
			//这里重新创建 springboot启动类,重新启动时,通过配置中心会就会重新获取配置了
			capture = new SpringApplicationBuilder(Empty.class).bannerMode(Mode.OFF)
					.web(false).environment(environment).run();
			if (environment.getPropertySources().contains(REFRESH_ARGS_PROPERTY_SOURCE)) {
				environment.getPropertySources().remove(REFRESH_ARGS_PROPERTY_SOURCE);
			}
			MutablePropertySources target = this.context.getEnvironment()
					.getPropertySources();
			String targetName = null;
		}
	}
通过SpringApplicationBuilder重新创建启动类,启动时就会重新拉取最新配置,然后发布 EnvironmentChangeEvent事件,通过对应的监听器重新加载带有@ConfigurationProperties 的配置类和作用域为 @RefreshScope 的bean。
@RefreshScope
该注解是 Spring Cloud 对bean 作用域做的扩展类型,这种类型的bean生命周期和单例不同,每一次调用调用/refresh方法都会清除所有该类型的bean。下次使用时,就会重新创建,然后注入最新属性变量。
具体来看一下代码。
public class RefreshScope extends GenericScope
		implements ApplicationContextAware, BeanDefinitionRegistryPostProcessor, Ordered {

	//.....
	@ManagedOperation(description = "Dispose of the current instance of all beans in this scope and force a refresh on next method execution.")
	public void refreshAll() {
		//调用清除缓存方法
		super.destroy();
		this.context.publishEvent(new RefreshScopeRefreshedEvent());
	}
	//......
}


public class GenericScope implements Scope, BeanFactoryPostProcessor, DisposableBean {

	@Override
	public void destroy() {
		List<Throwable> errors = new ArrayList<Throwable>();
		//清除缓存
		Collection<BeanLifecycleWrapper> wrappers = this.cache.clear();
		for (BeanLifecycleWrapper wrapper : wrappers) {
			try {
			//销毁所有 @RefreshScope 类型的bean
				wrapper.destroy();
			}
			catch (RuntimeException e) {
				errors.add(e);
			}
		}
		if (!errors.isEmpty()) {
			throw wrapIfNecessary(errors.get(0));
		}
		this.errors.clear();
	}
}
被销毁的bean 再下次使用时,会重新创建,这样已满足配置动态刷新的需求了。但是有些时候,在清除这些bean之后,想执行一些自定义的监听逻辑,怎么做呢?
Spring Cloud同样提供了相应的事件:RefreshScopeRefreshedEvent。在refreshAll方法在清除缓存之后,会发布该事件:
this.context.publishEvent(new RefreshScopeRefreshedEvent());
这里是留的扩展,如果有需要可以做一些扩展。目前在源码中看到 Zuul,Nacos都监听了该事件,具体细节有兴趣的可以去研究。
整合bus后的原理分析
老规矩:两种方案,我们选择第二种
方案一:

方案二:


Bus消息总线会提供一个/bus/refresh服务来实现应用的热刷新。不再使用actuator来提供人刷新逻辑。/bus/refresh服务要求请求必须是post请求,可用任意技术实现。
ConfigClient 实例都监听RabbitMQ中同一个topic【默认是SpringCloudBus】。当一个服务刷新数据的时候,它会把这个消息放入Topic中,这样其他监听同一Topic的服务就能够得到通知,然后去更新自身的配置。


推荐文章
Spring Cloud Config 动态刷新实现机制
消息总线Spring Cloud Bus
SpringCloud之Config配置中心+BUS消息总线原理及其配置
SpringCloud系列教程 | 第八篇:Spring Cloud Bus 消息总线
就这一次把Spring Cloud Bus消息总线彻底整明白
 IDEA激活码


